DIY
BAIT BOARDS
THE WORK BENCH OF FISHING BOATS
Alan McIntyre loves his boating DIY projects, and this one is a ripper!
You really can’t get by without a decent bait board, and I find it hard to imagine not having one. It keeps every thing you need at hand, up off the floor and provides a level work area to cut and prepare bait.
Most bait boards seem to be those ubiquitous plastic moulded units that stand elevated above an aluminium frame on a couple of alloy tube posts held in place by vertical rod holders. Some are made of stainless steel, with the board itself made of fibreglass and equipped with drink holders and bait containers. Any of these are fine. They work well and are very durable.
The boat I currently have came with one of those plastic moulded outfits and I fished with it for some time, but I was never that happy with it. Firstly, it sat too high and felt intrusive, so I cut the alloy posts so it could sit as low across the transom as possible. That helped for a while, but I still didn’t feel satisfied and always found it hard to clean at the end of the day. I wanted something flat, wider and without drink holders, or gutters that harboured old bait and off cuts.
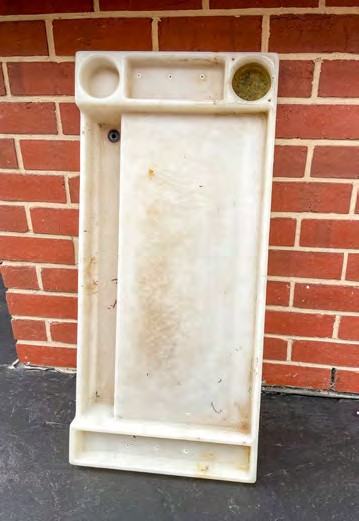
The original version - not so good
With this in mind, I went about designing a more suitable bait board for my needs, but before I get into that detail, remember that bait boards can be as simple as a length of timber slung across the rear of your boat —cheap and effective, but with a little thought you can design and construct something more sophisticated without spending too much cash.
To begin with, I removed the plastic bait board from the aluminium frame it sat on. With this out of the way, I roughly measured up the length and width for the size of the bait board I wanted. With those measurements checked, I assessed how it would fit around the cowling of the outboard both when the leg was down and, more importantly, when the outboard was tilted up and went from lock to lock. Of course, this can change depending on how high or low you want the bait board to sit. Next, I transferred these measurements onto some old cardboard and cut these pieces to make my template. This is the part you want to get right.
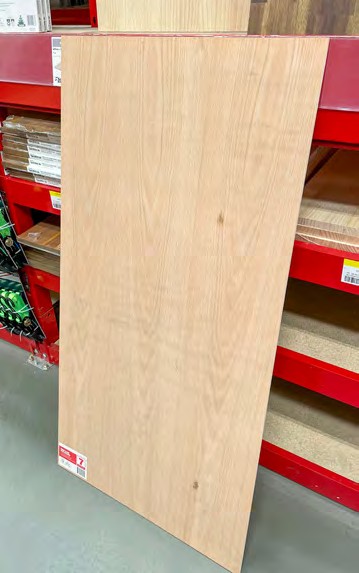
Once I was happy with the template, I purchased a length of 7mm waterproof ply from a hardware store. If you can’t get waterproof, then standard construction ply is fine. 7mm may seem quite thin, but the ply was going to be laminated with fibreglass, and suppor ted on the old aluminium frame. Keep in mind you can use thicker ply if you prefer, especially if you’re not going to laminate it with fibreglass, but if you do this, you may want to seal the timber with a mix of turps and linseed oil or some other treatment to help preser ve the timber.
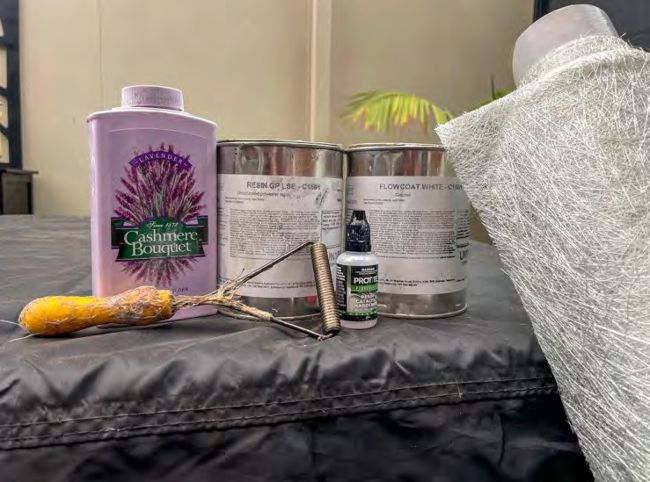
Fibreglass mat and resin are readily available and quite inexpensive
Using the template, I traced the outline and set about cutting the board. Happy with that, I then placed the board on top of the frame, carefully marked where the old screw holes were from the plastic board, and drilled them accordingly into the timber. Before doing all this, I held the bait board in place with clamps, tilted the engine, turned it from lock to lock, and checked that either end would not interfere with the hinged lids on top of the two inbuilt tubs and live bait tank. You want to make all the mistakes and fine tuning before you lock things down, but don’t worr y too much because the wonderful thing about materials like timber and fibreglass is that they can be easily modified, glued and filled.
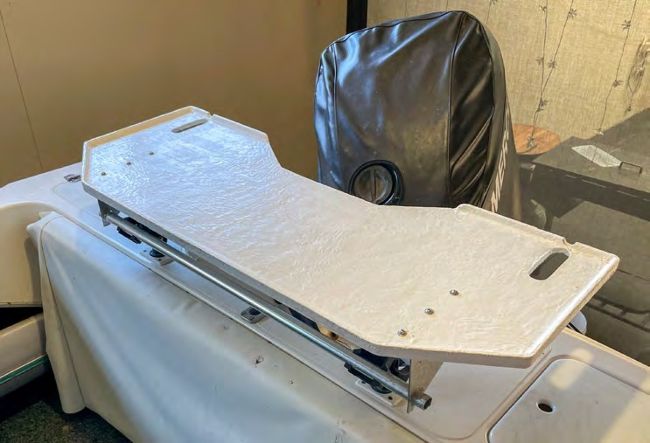
Make sure it all fits nicely before bolting down
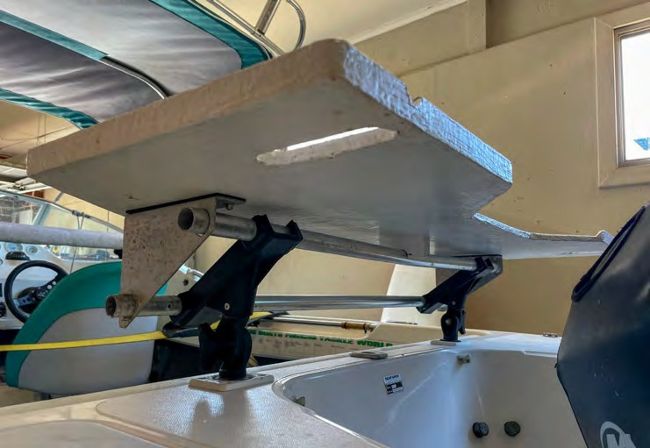
At this point I was able to mount it on top of the frame and check that all the fasteners fitted before securing it all down. When you get to this point you can get a good idea of how it will fit and if all your calculations have worked out OK. You may want to make some slight modification and, as you’ll see in the photo, I cut and angled the inboard corners so I could stand more comfortably next to the transom of my boat.
The next thing to do is think about fitting a lip or raised edge around the bait board. In my case I only wanted a very small lip and, as you’ll notice, it doesn’t go all the way around. I left the rear cutout area in front of the outboard because I wanted all the mess to wash off easily into the splash well of the boat. This may not be to everyone’s liking, and seems to go against the thinking that things may slide off when the boat is underway. However, I never leave any thing loose and really I’ve never had much of a problem with bait falling off. Besides that, I like to keep bait in a bucket.
For the lip I purchased a length of timber moulding from the hardware store and cut it into individual lengths according to each edge. To attach them I glued them in place with epoxy and carefully pinned them down with small thin nails or brads. Don’t hammer them in too far, as you want to remove them the after the glue has set. At this point you’ve pretty much got all the timber work done and, in my case, it looked a bit like an odd-shaped picture frame.
The next step is to prepare the timber to apply the fibreglass. If you’ve never had any experience with fibreglass, I’d suggest you practise first on pieces of timber off-cuts. The process is fairly straightfor ward, but you want to get some idea of how resins work, how to apply chop strand mat and how to seal it all after with Flow Coat. These materials might seem like they have the consistency of house paint, but they don’t necessarily behave the same way. Don’t worry, however, you’re not building an $80,000 boat. You can get all the fibreglass materials you want from hardware stores, but I went to Allnex Trade Centre at Gillman. Take your measurements and they’ll advise you of how much resin and Flow Coat you’ll need. With this in mind, I only used the lightest chop strand mat for the laminate.
Fibreglass will not bend and stick to sharp edges. It needs to have a radius of about a 10 cent coin. To overcome this, the simplest method is to mix up a bog made of talc and resin. I just used cheap talc I bought from a chemist, but make sure it is pure talc and not some other product. Combine the talc and resin until you have a consistency like peanut paste. Do this before you add the catalyst, keeping in mind catalyst is added at about 2-4 per cent to the resin only, not the combined paste. Once you are happy with the bog, apply it to any sharp corners, tooling it as best you can to give it a radius. Once it has hardened, sand it back and apply a coat of resin to both sides and let that set. Once that has been done, give it all a light sand back and a wipe over with Acetone.
I only laminated the top of my bait board with chop strand mat. That was enough to add strength and provide a good durable surface. You’ll need to purchase a roller to apply the chop strand mat with resin —a pretty simple process. Once this is all done, trim off all the excess fibreglass and sand back all the rough edges. You may need to touch up some bare spots with resin, too.
With this all done, it’s time to apply the Flow Coat. Mix in the catalyst at the same ratio and brush or roll it onto both sides. Flow Coat may seem like paint, but it behaves differently, as you’ll find as you attempt to brush it on. In some ways it needs to be moved around rather than done in brush strokes. I’m sure not an expert here and would suggest you practise on a scrap piece first. I gave my bait board two coats, sanding the first coat and then wiping it with acetone before applying the second coat .
That’s pretty much it; all that’s left to do is clean up the screw holes and attach it. You can attach rod holders to it if you like, but in my case I cut two elongated holes on each side and simply slid the rod butt through. It’s the perfect angle to see those bites. For each rod holder I simply cut two 32mm holes about 110mm apart and then, with a jig saw, cut out the piece of timber between them. The only other modification I made was to reinforce those vertical rod holders that the bait board posts slide into. They’re fitted through the top edge of the false transom. When the bait board was mounted in these rod holders, they felt a little too unstable or wobbly for me, so I braced them on the inside with some timber ply cemented in with epoxy glue. This makes the bait board feel much firmer.
I added a plastic chopping board, which is held in place with a length of shock cord. I like to be able to remove it and wash it over the side. The great thing about the Flow Coat finish is that stuff does not stick, and every thing washes off easily. If, after some years of use, you can always rub it back and apply another coat of Flow Coat to freshen it up.
Shape the board to fit your engine's contour
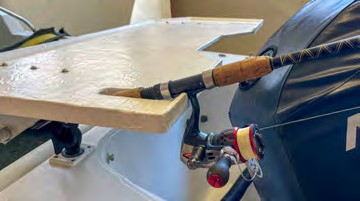
Angle your rod holders to suit
I’ve had plenty of use out of my home-made bait board, and I’m happy to say there is nothing I would change about it. It’s cheap, easy project, and you get what you want that suits your needs.